
My Breakthrough Method for Remarkable WordPress Speed Scores
My WordPress Speed Optimization Journey
Coming from the “Joomla” world, I was a total WordPress newbie when I started building this website.
And I was a total newbie with regard to everything connected to the improvement of website speed (website performance) and Google’s “web core vitals” – https://pagespeed.web.dev – which are important for the ranking of a website. Websites with insufficient core web vitals will rank lower than those with optimized parameters.
Please see this tech blog article to understand core web vitals in more detail.
What I report here is the result of many hours of research, sometimes frustrating trial and error, and finally success. I believe this article may help other WordPress newbies to circumnavigate many of the obstacles I had to face and overcome and facilitate the setup of a fast WordPress website in “no time”.
Disclaimer: This article is purely based on my personal experience. I have no financial relationship with any of the plugin developers or CDN operators mentioned in this post. My recommendations are solely based on what worked for me, shared in the hope that it might help others on their WordPress optimization journey.
Why Website Speed Matters
Before diving into the technical solutions, let’s understand why website speed is so crucial. Beyond the obvious user experience benefits, site speed directly impacts:
- Search engine rankings (Google explicitly factors it in)
- Bounce rates (slow sites lose visitors)
- Conversion rates (faster sites convert better)
- Overall user satisfaction
Understanding GTMetrix: Your Performance Measurement Tool
When optimizing a WordPress site, you need reliable metrics to track progress. GTMetrix has become my go-to tool for this purpose.
GTMetrix analyzes your website’s performance and provides actionable recommendations to make your site faster. It combines data from Google PageSpeed Insights and YSlow to give you comprehensive performance reports with:
- Overall performance score
- Structure score (evaluating your site’s HTML/CSS structure)
- Detailed loading times
- Specific recommendations for improvement
What I appreciate most about GTMetrix is its consistency and detailed breakdowns that help pinpoint exactly where optimization efforts should be focused. While you need a least a free account to unlock these details, it is well worth your registration effort.
Please see https://gtmetrix.com/blog/pagespeed-and-yslow-are-half-the-battle/ for more information about website performance.
My Optimization Journey: What Worked and What Didn’t
The LiteSpeed Challenge
Most WordPress hosting environments come with LiteSpeed Cache plugin pre-installed. While powerful, I found it overwhelming with its myriad of configuration options. Similar to Windows with its thousands of “bells and whistles,” it often feels like too many options lead to suboptimal performance for inexperienced users like myself.
Despite hours of tinkering with settings, I saw minimal performance improvements. The complexity of configuration options made it difficult to understand which changes were helping and which were hurting. I use Mac computers for a reason – simplicity often leads to better results.

Website with LiteSpeed only. Note the poor value for “Largest Contentful Paint”
The “Set-and-Forget” Solution That Almost Worked
Next, I tried AirLift, which takes an automated “Mac-like” approach to optimization. Initially, the simplicity was appealing – it required no manual configuration and automatically optimized everything.
However, this “overoptimization” created unexpected problems:
- WPForms checkboxes became unclickable
- Embedded YouTube videos on an Android tablet wouldn’t load until the user scrolled past them and back – a serious usability issue when content refers to videos that viewers couldn’t immediately see
While AirLift offers settings to fix these issues, implementing these fixes reduced my overall performance score by several percentage points.
👉 Tip: Always check new configurations on both Android and iOS mobile devices. The embedded video issue was neither visible on desktop computers, nor on my iPhone.
If you want to try AirLift: the easiest, and safest, way to access it is by installing the excellent WordPress firewall plugin “Malcare”. AirLift is fully integrated into Malcare’s dashboard. Simply go through their “Enable AirLift” procedure.
The Winning Combination: W3 Total Cache + SQLite + CDN
After these disappointments, I discovered a three-part solution that consistently delivers outstanding results:
1. W3 Total Cache (W3TC)
Unlike LiteSpeed’s more limited caching approach, W3TC offers comprehensive caching options:
- Page cache
- Browser cache
- Database cache
- Object cache
- CDN integration
The key difference is that W3TC creates static HTML versions of your dynamic WordPress pages, significantly reducing server processing time and database queries.
W3TC also offers HTML, CSS and JavaScript minification. While this theoretically should increase website speed, mine was slowed down upon enabling of these features.
Therefore, you should thoroughly test each optimization step because each WordPress and server environment is unique and different.
Why Caching Is So Effective
In the end, comprehensive caching alone was responsible for most of my performance gains. But what exactly are these different types of caches, and why do they make such a dramatic difference?
Understanding Different Cache Types
Page Cache
This is the most powerful form of caching. When a visitor requests a page from your WordPress site, PHP code typically needs to run and multiple database queries must execute to generate the HTML. Page caching saves this finished HTML output and serves it directly to subsequent visitors, bypassing these resource-intensive steps entirely.
Browser Cache
This instructs visitors’ browsers to store certain files locally (like images, CSS, and JavaScript) rather than re-downloading them on each visit. By setting appropriate expiration times for these resources, returning visitors experience much faster page loads since many elements are retrieved from their local storage rather than your server.
Database Cache
WordPress makes numerous database queries on each page load to retrieve posts, comments, user data (if applicable), and settings. Database caching stores the results of these queries temporarily, eliminating the need to repeatedly execute the same queries and reducing the load on your database server.
Object Cache
WordPress uses its internal object cache to temporarily store data objects retrieved from the database or API calls. However, this cache only exists during a single page load by default. Persistent object caching (using SQLite in my case) maintains these objects between requests, significantly reducing time-consuming database operations and processing time.
Why It Works So Well
Caching is particularly effective for WordPress sites because:
- It addresses WordPress’s dynamic nature: By default, WordPress regenerates pages on every visit, which is inefficient when content doesn’t change frequently.
- It reduces database dependency: WordPress relies heavily on database interactions, which are often the main performance bottleneck.
- It minimizes PHP execution: PHP processing is relatively resource-intensive compared to serving static files.
- It scales well with traffic: A properly cached site can handle significantly more concurrent visitors without performance degradation.
For most WordPress sites, the database and PHP processing represent the largest performance bottlenecks. By implementing comprehensive caching strategies, you effectively bypass these bottlenecks for most visitors, resulting in dramatic speed improvements without changing your actual content or functionality.
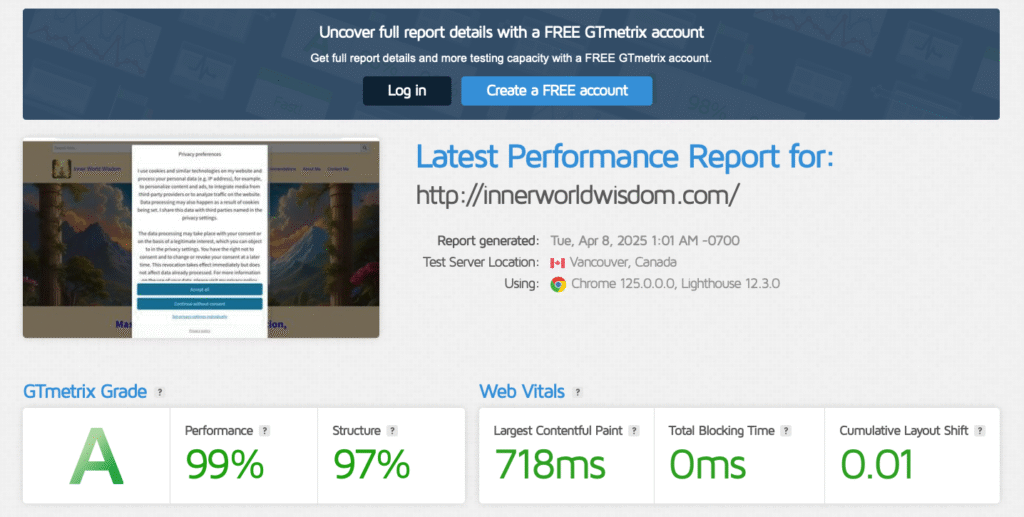
Website with W3TC only, no CDN enabled. Note the “structure” value of 97%.
2. SQLite Integration for Object Caching
While W3TC offered great improvements, my diagnostics showed that object caching (which handles script caching) could be further optimized. This led me to implement the SQLite plugin.
SQLite was specifically designed for shared hosting environments, making it perfect for most WordPress users. On one of my test servers, it improved performance by more than 5%.
Important technical note: For optimal SQLite object cache performance, you may need to activate PHP extensions that aren’t enabled by default:
- APCU
- igbinary
If you’re unsure how to activate these, please ask your hosting provider for assistance.
3. The CDN Advantage
The final piece of the optimization puzzle was implementing a Content Delivery Network (CDN). While many think CDNs only benefit websites with global audiences, they offer significant advantages for everyone:
Security Benefits:
- Protection against DDoS attacks
- Web Application Firewall capabilities
- SSL management
Performance Benefits:
- Further code optimization (this boosted my “structure” score to 99%)
- Reduced server load
- Faster content delivery to all users
I’m currently using QUIC.cloud, but there are several excellent alternatives worth considering:
- Cloudflare (with a generous free tier)
- Bunny.net (affordable and high-performing)
- StackPath (enterprise-grade security features)
- KeyCDN (pay-as-you-go pricing model)
Understanding CDN Infrastructure
CDNs are networks of servers distributed across various locations worldwide. A key concept in CDN architecture is the “PoP” (Point of Presence). A PoP refers to a physical location where the CDN has deployed servers and networking equipment. These strategically placed PoPs ensure content is cached closer to end users, reducing latency and improving delivery speeds. Each PoP contains edge servers that store cached copies of your website’s static content like images, CSS, JavaScript files, and other assets.
Important Testing Consideration: CDN Caching
It’s crucial to understand that a CDN builds its own cache. This has important implications when using performance testing tools like GTMetrix.
👉 Tip: For accurate GTMetrix results, you need to first build the CDN cache at GTMetrix’s testing location before running your tests. This can be accomplished by:
- Identifying the IP address range that GTMetrix uses for testing
- Using a VPN to simulate browsing from that location
- Visiting and “clicking through” your website to populate the CDN cache
- Only then running your GTMetrix test
Without this preparation step, your GTMetrix results may not reflect the true optimized performance that real users experience after the CDN cache is properly built. This is especially important when comparing performance metrics before and after implementing CDN services.
The Results: 99% Performance Score on GTMetrix
Through this combination of W3 Total Cache, SQLite plugin, and QUIC.cloud CDN, my website now consistently achieves:
- 99% overall performance score on GTMetrix
- 99% structure score
- Significantly improved Web Core Vitals
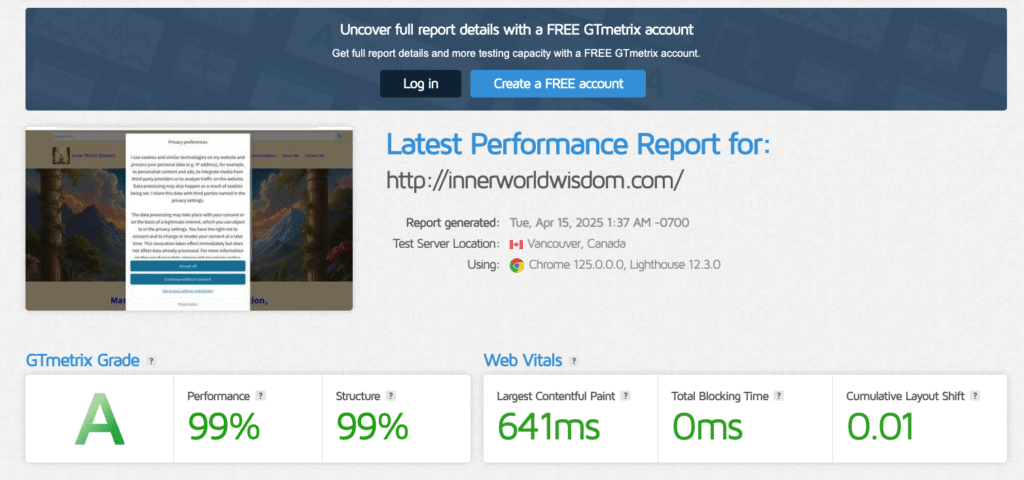
Website with CDN enabled. “Structure” improved by 2%.
What Does Google Site Kit Say?
You might say: Well, the GTMetrix score looks good, but what about the “really relevant” Google metrics?
Here they are:
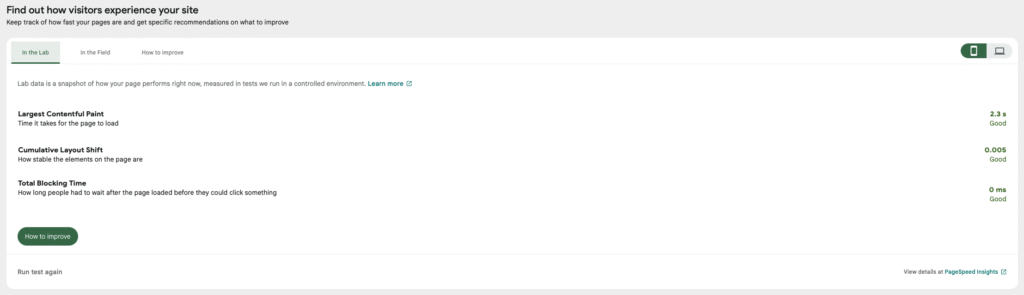
Google Site Kit metrics for mobile devices.
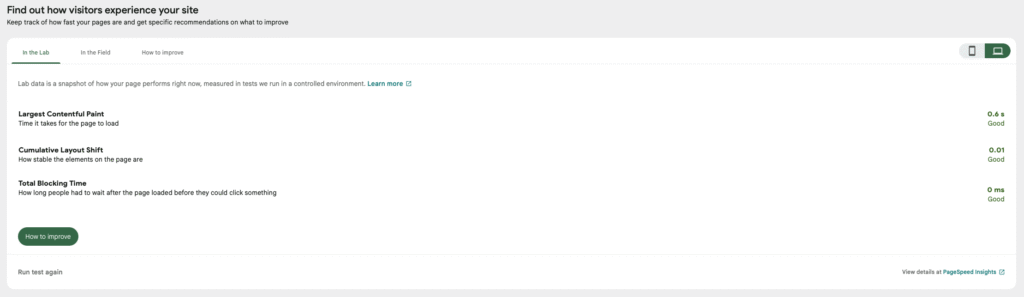
Google Site Kit metrics for desktop computers.
Key Takeaways for WordPress Beginners
- Start with the basics: W3 Total Cache offers the best balance of power and usability
- Consider SQLite: Especially if you’re on shared hosting
- Don’t underestimate CDNs: They offer benefits beyond global content delivery
- Measure consistently: Use GTMetrix to track your progress
Conclusion
While WordPress optimization can feel overwhelming for beginners, finding the right combination of tools makes all the difference. My journey from WordPress novice to achieving consistent 99% performance scores demonstrates that you don’t need to be a technical expert to create a lightning-fast website.
The W3TC + SQLite + CDN approach has proven reliable, maintainable, and highly effective. I hope sharing my experience saves you time and frustration on your own optimization journey.
Have you tried other WordPress optimization techniques that worked well? I’d love to hear about your experiences in the comments below!